Recording a completed community education case activity
When you process a completed activity you enter the time you spent on it. To record a completed activity:
1 Open the case for which you want to record an activity.
2 On the
Details tab at the
Activities section click

.
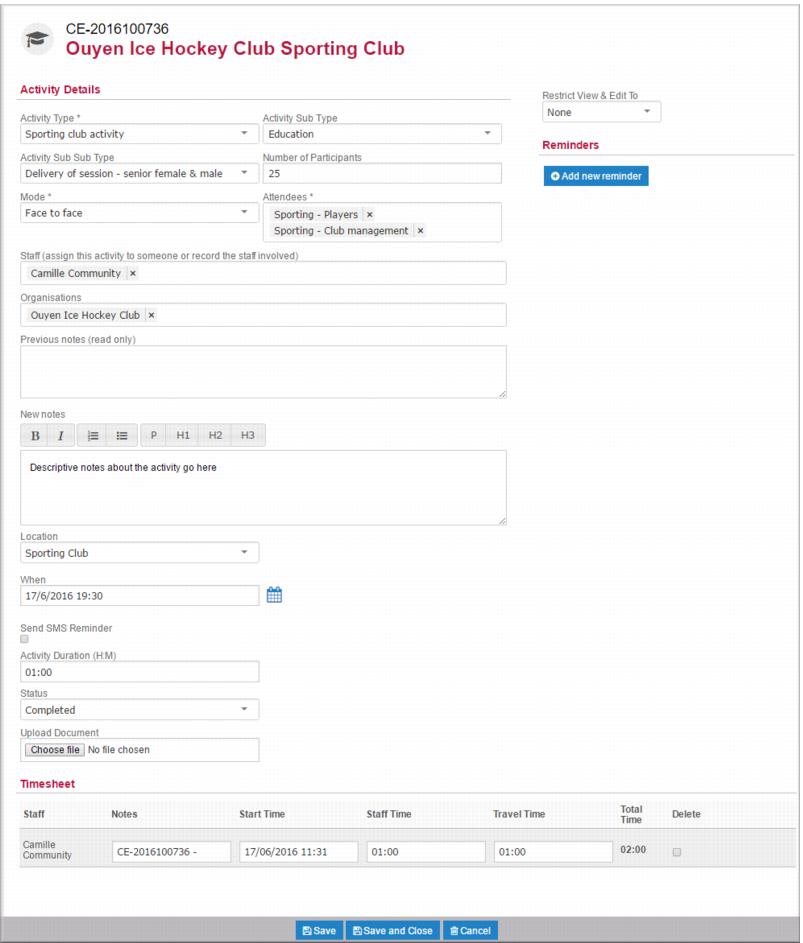
The activity details page displays. The names of the primary (and secondary) community education worker display in the Staff field. If you are recording an activity for a school or sporting club case, the name of the school or sporting club displays in the Organisations field. If you are recording an activity for a service promotion case leave this field blank. 3 In the
Activity Type field,

select the type of activity you want to record.
4 In the
Activity Sub Type field,

select the activity sub type.
5 IF applicable, in the
Activity Sub Sub Type field,

select the activity sub sub type.
| Not all activity types have a corresponding set of sub sub types. See Activities for a list of possible community education activity types and sub types. |
6 Where it is relevant, enter the number of people participating in the activity in the Number of Participants field.
7 In the
Mode field,

select the delivery mode for this activity.
8 In the
Attendees field,

select the attendee group or groups.
| If you are recording an administrative activity the mode is Written and the attendees are Self. |
9 The Staff field defaults with the name of the primary (and secondary if one is recorded) CE worker for the case. IF required, add or remove staff.
| To look up the name of a staff member in this field, enter the first couple of letters of their name and select them from the list that displays. |
10 In the New Notes field, enter your notes for this activity.
11 In the
Location field,

select the location where the activity took place.
12 In the When field, use the calendar tool to select the date and time of the activity.
13 In the Activity Duration (H/M) field, select the duration of the activity.
| You can enter a value directly in this field in the format HH:MM. |
14 In the
Status field,

select
Completed.
The Timesheet section displays with a separate line for each member of staff you associated with the activity. The date and time you specified in the When field displays in the Start Time column and the value you entered in the Duration field now displays in the Staff Time column of the timesheet. 15 IF necessary, change the duration value the in the Staff Time column.
16 IF necessary add travel times for each member of staff on the timesheet.
17 Click

.
The activity is completed.
Recording participant feedback
Participants in community education presentations to schools and sporting clubs are invited to submit feedback. You record feedback against the activity record for the presentation. You do this for each feedback sheet received:
1 From the case record open the activity you want to record feedback for.
2 IF:

The case is for a school click

or

as appropriate.
The case is for a sporting club click

or

as appropriate.
The feedback page for that participant group displays.
3 The
Completed At field defaults to today’s date,

select the date that the feedback was recorded.
4 Record the feedback from the evaluation sheet into the feedback page.
5 Click

.
6 Repeat steps 2–5 for each evaluation sheet received for that activity.
Activity notes
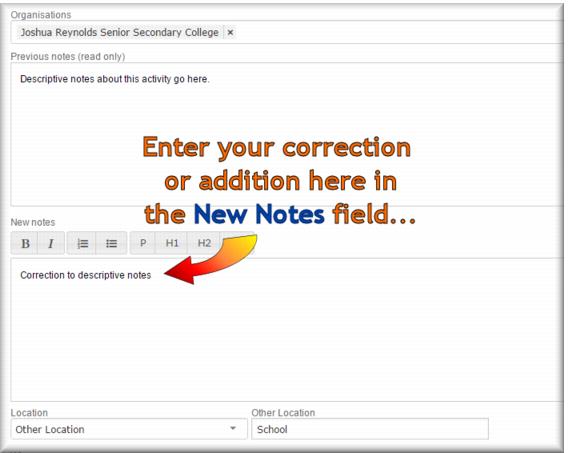
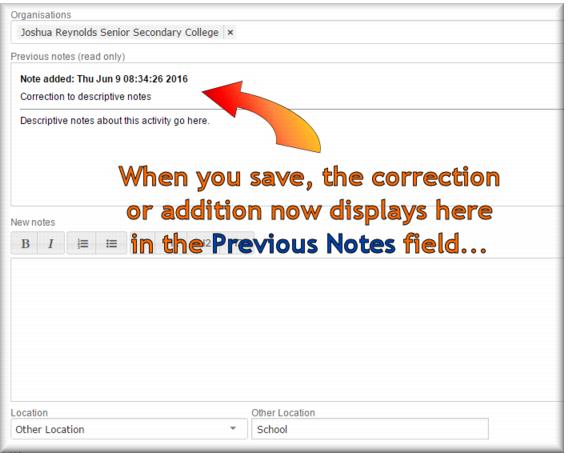
When you record an activity you have the option of adding a descriptive note. You cannot change or delete an activity note once you save it. Notes you have saved in an activity record display in the Previous Notes field. However, you can append a correction or addition in the New Notes field. When you save the record, your additional notes display in the Previous Notes field below your original note. The sequence of illustrations below shows the process.
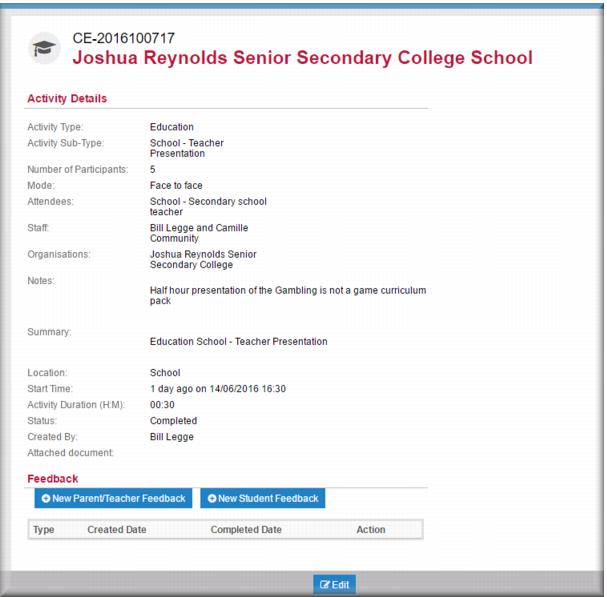
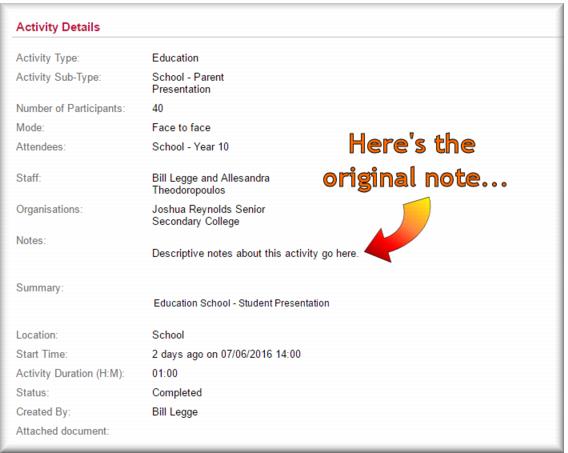
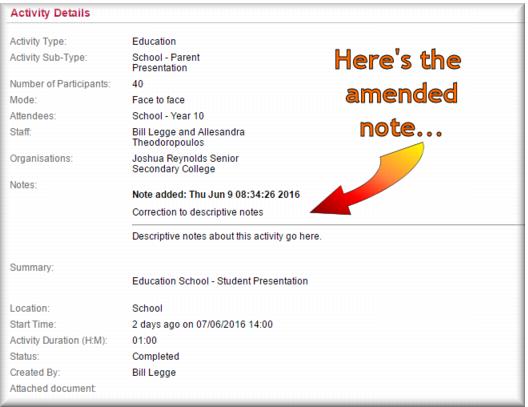
Notes saved in an activity display in the Activity Details section when you open the activity record in view mode.
If you open the activity for editing you enter your correction or addition to the note in the New Note field.
When you save the amended activity record, your additional notes now display in the Previous Notes field.
In the Activity Detail page the additions to the note display.
Scheduling an activity
If desired, you can schedule a future activity for yourself or other members of your team. When you schedule an activity Gambler’s Help Connect creates a reminder for all members of staff who are associated with that activity. The scheduled activity is also posted on the Gambler’s Help Connect calendar which can be an aid in work planning and avoiding schedule conflicts. Scheduled activities also display in your My Activities list and in the Activities tab of the case record.
| Gambler’s Help Connect provides a useful scheduling function but there is no obligation to use it. |
You can schedule an activity:
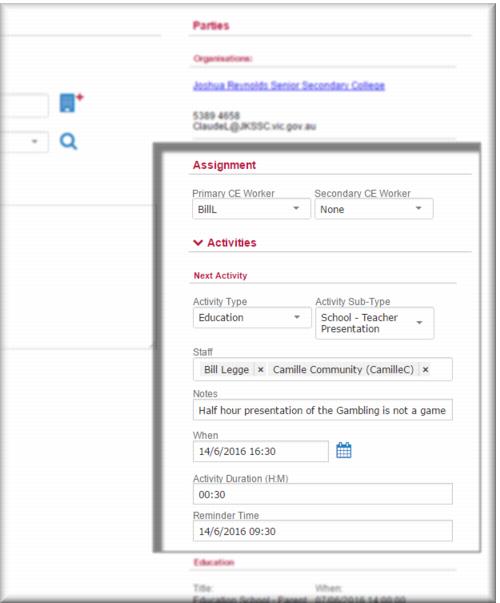
Directly in the case record in edit mode
From the
Activities section of the case
Details tab in view mode
From the
Activities tab of the case record in view mode.
Scheduling an activity in the case record in edit mode
1 Open the case you want to schedule an activity for and click

.
The selected case opens in edit mode. 2 Click > Activities.
The Activities section opens.
3 In the
Activity Type, field

select the activity.
4 In the
Activity Sub Type field,

select the activity sub type.
5 IF applicable, in the
Activity Sub Sub Type field,

select the activity sub sub type.
6 In the Staff field, search and select the staff you want to associate with this activity.
7 In the Notes field enter a brief descriptive note about the planned activity.
| The Notes field is system mandatory so if you don’t enter something in this field you can’t save the activity. |
8 In the When field select the date and time for the planned activity.
9 In the Activity Duration (H:M) field select the duration of the planned activity.
10 In the Reminder Time field, select the day and time you want to be prompted with a reminder.
11 Click

.
The activity is scheduled. Scheduling an activity in the activity record
1 Open the case for which you want to schedule the activity.
2 Either:
Click

in the
Activity section of the
Details tab of the case record
Select the
Activities tab and then click

.
The Activity Details page displays.
3 In the
Activity Type field,

select the type of activity you want to record.
4 In the
Activity Sub Type field,

select the activity sub type.
5 IF applicable, in the
Activity Sub Sub Type field,

select the activity sub sub type.
6 Where it is relevant, enter the number of people participating in the activity in the Number of Participants field.
7 In the
Mode field,

select the delivery mode for this activity.
8 In the
Attendees field,

select the attendee group or groups.
9 The Staff field defaults with the name of the primary (and secondary if one is recorded) CE worker for the case. IF required, add or remove staff.
10 In the New Notes field, enter your notes for this activity.
11 In the
Location field,

select the location where the activity took place.
12 In the When field, use the calendar tool to select the date and time of the activity.
13 In the Activity Duration (H/M) field, select the duration of the activity.
14 Leave the default value in the Status field - Opened.
15 Click

.
The activity is scheduled. Viewing activities
There are three approaches you can take to viewing activities:
My Activities – this list shows all open activities where you are one of the specified staff. This can be useful where you want to quickly check for activities that you should have completed or for upcoming activities.
View all activities for a specific case – with this approach you can see all activities of all statuses for all staff for a particular case. You can do this by clicking
Activities on the
Details tab of the case record OR by clicking the
Activities tab of the case record. This approach can be useful when you are reviewing a case and want to see what has been done or what needs to be done.
Activities search – this procedure enables you to search and filter all community education activities for all cases at your agency. This approach can be useful for a team leader who needs to cover an absence and wants to know what upcoming activities there are for the absent member of their team.
Activity statuses
The Status field of the activity record has four possible statuses you might use:
Opened – the activity has been booked but not completed
No show – an event or meeting was cancelled (or you were stood up) by the party you were planning on meeting or presenting to after you turned up to the location.
No action required – use this status to cancel a scheduled activity where it isn’t possible or necessary to reschedule it. You also use this status when you have scheduled an activity in error.
Completed – the activity is complete and you have entered your times.
Rescheduling activities
You can reschedule any activity which has the status of Opened. This includes activities for which the due date is in the past:
1 From your My Activities list, or from the case record open the scheduled activity.
2 In the When field use the calendar function to set a new date and time for the activity.
3 Optionally, update the activity notes and location as required.
4 Click

.
The activity is rescheduled. Cancelling a scheduled activity
From time to time you might need to cancel a scheduled activity. The cancelled activity remains associated with the case history:
1 From your My Activities list, or from the case record open the scheduled activity.
2 In the
Status field,

select
No action required.
3 In the New Notes field, briefly describe the reason for the cancellation.
4 Click

.
The scheduled activity is cancelled. Cancelling a completed activity
From time to time an activity might be recorded in error. For example, an activity might be mistakenly recorded against the wrong client or case. You can cancel a completed activity:
1 Open the case record containing the activity you want to cancel.
2 Select the Activities tab.
3 In the activities list, locate the activity and click

.
The activity record opens in edit view. 4 In the New notes field, enter a note explaining the cancellation.
5 In the
Status field,

select
No action required.
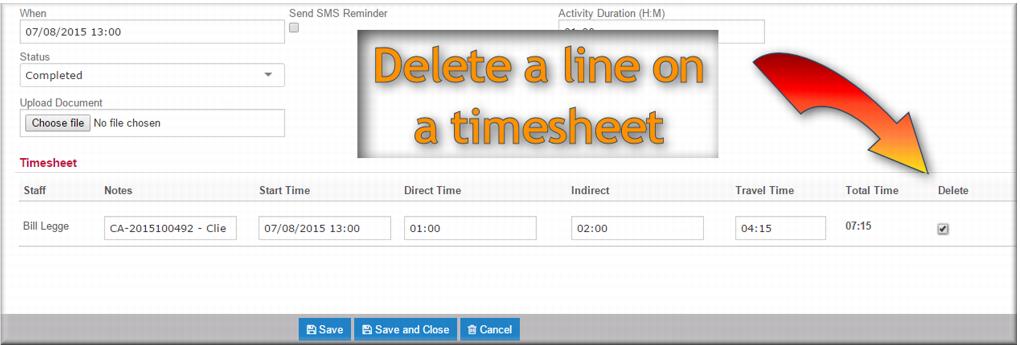
6 In the Timesheet, select Delete.
7 Click

.
| If you just want to remove a member of staff from a closed activity, delete them from the Staff field and delete their timesheet entry. Then save and close. |
![MCj04347500000[1]](../GHC102/images/GHC-102-PM.1.147.06.jpg)
![MCj04347500000[1]](../GHC102/images/GHC-102-PM.1.147.09.jpg)
![MCj04347500000[1]](../GHC102/images/GHC-102-PM.1.147.10.jpg)
![MCj04347500000[1]](../GHC102/images/GHC-102-PM.1.147.12.jpg)
![MCj04347500000[1]](../GHC102/images/GHC-102-PM.1.147.26.jpg)
![MCj04347200000[1]](../GHC102/images/GHC-102-PM.1.147.32.jpg)
![MCj04347500000[1]](../GHC102/images/GHC-102-PM.1.147.50.jpg)